Experiments in Ray-Tracing, Part 3 - Basics
This is a very old article, included for historical interest only!
Before I start an explanation of the basics of ray-tracing, it’s worth considering how images are formed in the real world.
Imagine taking a photo with a camera. The scene you’re photographing will have one or more light sources (bulbs, the sun, the camera flash). Each light source emits a vast number of photons. Depending on the direction it’s emitted in, each photon can either head off into the sky, never to be seen again, or strike an object. If a photon strikes an object, it may either be absorbed (slightly warming that object), or may be reflected at an angle depending on the surface characteristics of the object. Some photons may happen to travel through the lens of the camera, hit the CCD or film, and contribute to making an image. Of course, most (in fact the vast majority of) photons will be absorbed by objects other than the camera.
Given that a light bulb could well emit one hundred billion billion photons per second, attempting to model this on a PC would be a never-ending task. We thus have two options: reduce the simulated number or kind of photons (perhaps by treating each as a cone of light), or try a different method altogether. Enter ray-tracing.
Ray-tracing attempts to minimize this by reversing the process. Instead of tracking light from source to object to camera, ray-tracing tracks rays from camera to object to light source.
Any renderer must pick a colour for every pixel on the screen (or window). The first stage in ray-tracing is to cast rays, from the camera position, through every pixel on the screen. (Imagine firing lines from your eye, through your monitor, to hit objects in virtual space behind the monitor). These rays are called primary rays.
(It’s worth pointing out that if you render a full-screen, 1280x1024, scene, you’ll be casting well over a million primary rays. That’s still better – by a sizable factor – than casting from the light source outwards. But it does indicate that ray-tracing is going to be computationally expensive).
Each primary ray will either hit an object in the scene, in which case we need to determine the colour at that point, or will disappear off into infinity, in which case we assign that pixel some sort of background colour. Of course, determining the colour when a ray strikes an object is somewhat complicated, but one step at a time.
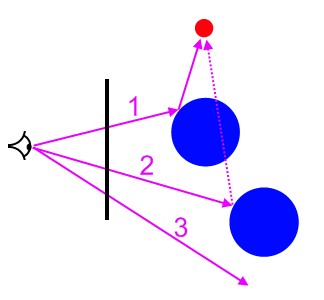
Enough words. Here’s a picture:

On the left is a badly-drawn eye. That represents the position of the camera (or, for a real-world comparison, your eye). The black bar in the middle is your monitor, seen edge-on. The red dot is a light source; the two blue objects are spheres in our virtual world, and the purple lines marked 1, 2, and 3 are some examples of primary rays.
- The first ray intersects an object. Once a ray hits an object, we then need to determine the surface colour, as determined by illumination by the lights. We cast a vector from the intersection point to each light; if it hits the light, then we perform the appropriate lighting calculations; if not, that part of the object is in shadow. In this case, the object is illuminated.
- The second ray also intersects an object, but when we cast a vector to the light source, we find another object in the way. We consider this part of the object to be in shadow.
- The third example ray doesn’t hit anything. We assign this pixel the background colour.
So the colours of those three example pixels will be (assuming the objects are actually blue, the light is white, and the background is black):
- Light blue, or perhaps even white, depending on how shiny the surface is;
- Dark blue, or perhaps even black, depending on the ambient light;
- Black.
In the next article, I’ll explain those “dependings”, and I’ll also cover secondary rays, which simulate mirrored surfaces.
Published: Tuesday, July 15, 2008
You may be interested in...
Hackification.io is a participant in the Amazon Services LLC Associates Program, an affiliate advertising program designed to provide a means for sites to earn advertising fees by advertising and linking to amazon.com. I may earn a small commission for my endorsement, recommendation, testimonial, and/or link to any products or services from this website.