Rendering the Mandelbrot Set using Haskell and wxWidgets
 In this article I’ll show how to render the Mandelbrot set using Haskell, displayed in a window
using wxWidgets / wxHaskell.
Note: The code I’ve written here makes no attempt to be fast. In fact, the code I present here is a lot slower than the version I originally wrote, because I’ve decided to go for code simplicity. I’ll note any particularly slow bits of the code as I go along, but please don’t think the lack of performance is due to the language used.
I’m going to present this code backwards – starting from the bottom-most function, and working my way towards main.
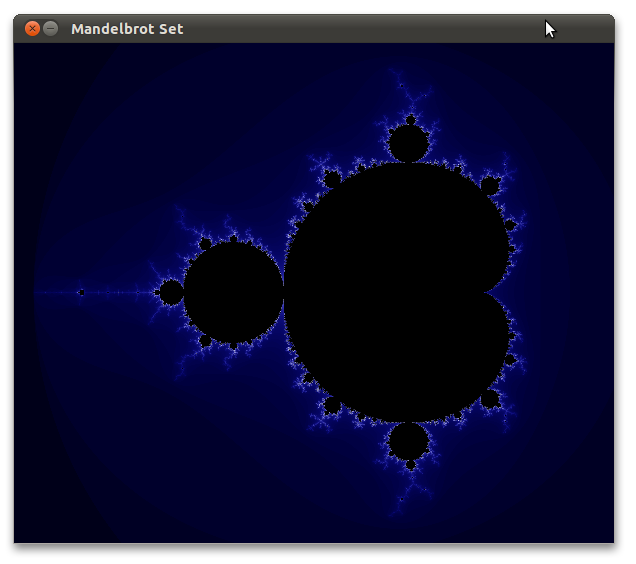
The Mandelbrot Set is (in simplified terms) a way of categorizing points in the two-dimensional complex plane: some points are in the set, and some points are not. In the image above, the black pixels are in the Mandelbrot set.
The algorithm I’ve chosen to render the Mandelbrot set is the escape algorithm, which is probabilistic – it determines that points are likely to be in the set (or not), but it cannot say for certain. We must pick a trade-off between performance and accuracy.
import Data.Complex

mandelbrot c =
    iterate 0 0
  where
    iterate z i
        | i > maxIterations = Nothing
        | magnitude z > 2   = Just (i / maxIterations)
        | otherwise         = iterate (z^2 + c) (i+1)
    maxIterations = 100
Given a point c on the complex plain, we keep iterating until its distance from the origin
is greater than two, or until we reach a set limit. If we reach the limit of maxIterations,
we mark the point as being in the set, and return Nothing. If we escape, we return Just N,
where N is a scaled value indicating the number of iterations required to escape.
Strictly speaking, that number N is irrelevant to the set, but it allows us to draw pretty
colors around the set. On each iteration, we set z’ to be z2 + c.
Performance Note: Taking the magnitude of the current complex value is a very slow way of working out whether we’ve escaped or not – a much better way would be to escape if the absolute value of either the real or imaginary parts of the value exceed two.
Now that we can compute a value for any point on the complex plain, we’ll need to convert it to an RGB value.
import Graphics.UI.WX

toColor Nothing =
    rgb 0 0 0
toColor (Just i) =
    rgb r g b
  where
    r        = toByte (i * i)
    g        = toByte (i * i)
    b        = toByte (sqrt i)
    toByte d = floor  (d * 255)
Points in the set (Nothing) are colored black, while points not in the set are given a color
ranging from white to blue, by squaring or square-rooting the scaled iteration count for each of
the red, green, and blue components.
Performance Note: Again, using a square-root function here is very slow. It would be far better to use some form of lookup-table to assign colors.
When I wrote the original version of this program, the output appeared very pixellated. I decided to add 4x anti-aliasing to smooth things out a bit. Essentially, for each point in the image, I pick four sub-pixel points, get the color for each, then average them.
colorMandelbrot aa (x,y) =
    averageColors $ map color aa
  where
    color (ax,ay) = toColor $ mandelbrot ((x + ax) :+ (y + ay))

averageColors cs =
    rgb (tx colorRed  )
        (tx colorGreen)
        (tx colorBlue )
  where
    tx f = (sum $ map f cs) `div` length cs
The colorMandelbrot function takes a list of offsets for anti-aliasing, as well as an x-y point in
the complex plane. That gets converted to a complex number using the :+ constructor.
Picking anti-alias offsets makes use of the scaling function. It picks arbitrary neighbour pixels, and scales them to find the actual distance between them. I’ve hard-coded the zoom and translation parameters here to show the whole set, but you could tweak them to display different parts off the set.
import Control.Applicative

antialias w h =
    (,) <$> [-xo,xo] <*> [-yo,yo]
  where
    (x0,y0) = scale 0 0 w h
    (x1,y1) = scale 1 1 w h
    xo      = (x1-x0) / 3
    yo      = (y1-y0) / 3

scale x y w h =
    ( dbl (x - w `div` 2) / 100.0 / zoom + offsetX
    , dbl (y - h `div` 2) / 100.0 / zoom + offsetY )
  where
    dbl v   = fromIntegral v
    zoom    =  1.8
    offsetX = -0.5
    offsetY =  0.0
The operators <$> and <*> are just being used here to produce combinations of coordinates
– a list comprehension or ‘do’ block would have worked just as well.
As we move up the code, we move away from the mathematical description of the set, towards the messy realities of actually drawing it in a window. I’m going to render the set as a bitmap, and to create that bitmap, I need to create a stream of color data. I’ll create the color data from a stream of coordinate data.
bitmapOrderCoordinates w h =
    map ( \(y,x) -> scale x y w h) $ (,) <$> [1..h] <*> [1..w]
For a given bitmap width and height, this function gives a list of the actual complex plane
coordinates to color. The x and y values might seem like they’re the wrong way around, but
that’s necessary to get the data stream order correct.
Finally, I can actually create the bitmap:
createImage sz =
    imageCreateFromPixels sz $ map (colorMandelbrot aa) coords
  where
    coords = bitmapOrderCoordinates w h
    aa     = antialias w h
    w      = sizeW sz
    h      = sizeH sz
So I now have a bitmap ready to be drawn. For simplicity, I’m just going to draw it to a fixed-size window.
main =
    start mainWindow

mainWindow = do
    f <- frameFixed [text     := "Mandelbrot Set"]
    p <- panel f    [on paint := onPaint]
    set f           [layout   := minsize (sz 600 500) $ widget p]

onPaint dc rect = do
    img <- createImage $ rectSize rect
           drawImage dc img pointZero []
This results in a windows that looks a little like the following:

So there we go. Fancy improving my code? Here’s a few ideas:
- See just how fast you can make this code.
- Allow the user to resize the main window.
- Allow the user to zoom in/out and pan around – possibly add some controls to allow this.
- Fix the application not responding while rendering the set.
- Experiment with variations on the Mandelbrot set – try different powers or variations on the iteration z’ <- z2 + c.
Published: Monday, December 27, 2010
You may be interested in...
Hackification.io is a participant in the Amazon Services LLC Associates Program, an affiliate advertising program designed to provide a means for sites to earn advertising fees by advertising and linking to amazon.com. I may earn a small commission for my endorsement, recommendation, testimonial, and/or link to any products or services from this website.